Showing posts with label Winter. Show all posts

January 08, 2013

Location: Bryce Canyon (Winter)

Inspiration Point at Sunset, Bryce Canyon National Park

After exhausting our options in the Grand Canyon, my friend, Beck, and I decided to head up to Bryce Canyon. I have been wanting to get back to Bryce since I had a micro short stay almost two years ago. Winter in Bryce creates a great contrast between the snow and red rock hoodoos, but it can come at a price. I thought the Grand Canyon was cold, but I had no idea how cold it could get in Bryce. At one point my iPhone weather app said -13 degrees F! Not much you can do before your mind and body become lethargic and wonder why the crap you're standing on the edge of a cliff in this insanely cold weather. Sometimes I got so enthralled in the photo taking that I forgot I should probably put my gloves back on or risk frost bite. The reality sets in after I've gotten back in the warm car and the feeling in my fingers and toes comes back with a vengeance. Bryce in the winter really is unbelievably beautiful. If you can fight the cold it is well worth a visit. 

Sunrise at Sunset Point, Bryce Canyon National Park

First light on Bryce Canyon's hoodoos in winter at Sunset Point.
Sunrise at Sunset Point, Bryce Canyon National Park
Swamp Canyon just after Sunset, Bryce Canyon National Park
Inspiration Point sunset panorama, Bryce Canyon National Park

Some tips for shooting in cold weather: 
  1. Batteries are the first thing to go when it's cold. Have a spare or two and keep them in a pocket with a hand warmer wrapped around it. I've even seen some photographers place a hand warmer on the outside of the camera and attach it with a rubber band. 
  2. Keep your hands warm. I struggle with this myself, mostly because I don't have the proper gear, but my hands are the first thing that get cold. I need my hands to work the small buttons on the camera, adjust the ball-head or focus the lens, but with thick gloves it can be awkward. Most of the time I just take a glove off to make a quick adjustment and fumble through the rest with my gloves on. A shutter release cable makes it easier to find the shutter button with gloves. Hand warmers are also good to keep in your pockets or stick inside the glove for that extra bit of warmth.
  3. Watch your breath. Condensation will build up on anything close to your airway and in freezing temperatures it will immediately turn to ice. Not so fun when your filters or front element of your lens gets covered in ice. I should also note that care should be taken when changing lenses in freezing temperature. I'm not always the best at keeping to this, but it's something to consider.
  4. Bundle up and layer. Come prepared to face the elements with the proper gear. A light jacket and sneakers aren't gonna cut it. And don't forget a beanie.
  5. Last but not least, have fun! Shooting in freezing temperatures is challenging, but there is a certain satisfaction that comes from enduring these conditions and coming away with lasting imagery. 

December 22, 2012

Portraits


Portraits aren't exactly my gig, but for the last month I've been doing quite a few. I guess with the holidays everyone wants their portraits taken for Christmas cards, and I am more than willing to do my best to accommodate their needs. I love photography, but there are things I love and things I like to photograph. Portraits are one of those things I like to photograph. I've been lucky to photograph some amazing people that I admire and look up to. So my experiences have gone from nerve-racking to casual and fun. I feel like my approach to portraits is more casual and honest than anything. My experience in documentary work has given me the confidence to keep shooting when situations are more candid and not as staged. I think the best portraits come from moments like these anyway. 

If you're interested in getting your portrait taken (families, individuals, bridals, studio, outdoor...), give me a call: 801.232.2153. I am willing to negotiate price. Call or email me with inquiries (lindsaydanielsphotography@gmail.com).

November 20, 2012

Location: East Canyon and Little Dell Reservoirs

East Canyon Reservoir, Utah

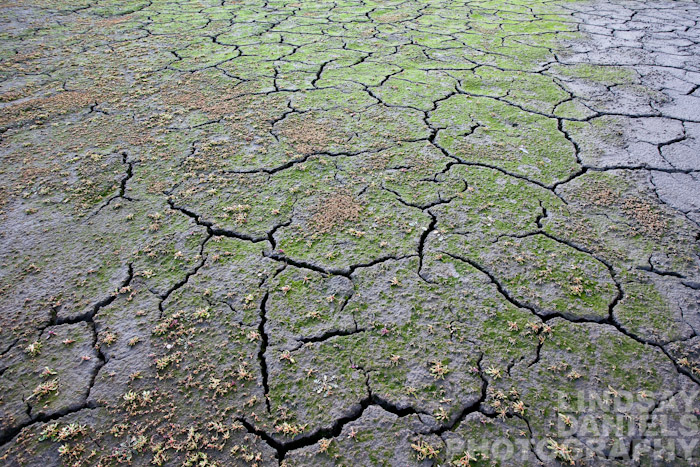
The last few work days I've been able to get off early, and I've taken every advantage to go get some new imagery. I'm lucky to live in such a diverse area that I sometimes have trouble deciding which way to go. Recently I've been heading east of Salt Lake and checking out several of the surrounding reservoirs. A week or so ago I made it to East Canyon, but just as a low clouds started to envelop the scene and turn it grey. I was intrigued by what I saw so I decided to return. With the reservoir so low this time of year the inlets and outlets create a photographers dream: leading lines, cracked mud, bright green undergrowth. I was lucky enough to find some clean patches of the cracked mud below; most of the area was trampled by cattle. 

"Crack" (aptly named by my brother) at East Canyon Reservoir, Utah

East Canyon Reservoir, Utah

Little Dell Reservoir, Utah

Little Dell is just on the way to East Canyon and can be seen from the top of Emigration Canyon. It's a great little reservoir that I've been wanting to shoot for a while. Far enough away from the hustle and bustle of the city, but close enough to feel like it's in my backyard. I'm hoping as it gets colder these reservoirs will freeze and produce some interesting imagery. I just have to figure out how to keep this early shift...

Little Dell Reservoir, Utah

Little Dell Reservoir, Utah

Little Dell Reservoir, Utah
As a side note, one of my Instagram photos was chosen as a finalist for the @igutah #utahwildlife contest. If you're on Instagram check it out!

Here's the photo and link


January 29, 2012

Day Full of Photography


I love the days that begin and end with photography.  Yesterday was one of those days.  I got up extra early to make it to Park City before sunrise.  In such a photogenic setting and just off the main road, the Park City barn has been photographed more than a few times.  I was hoping for some unique light so I could come away with something different.  
I like to think of the photo canvas as split up into thirds.  Not only two dimensionally, but three dimensionally as well.  I know, a photograph is only two dimensional, but hear me out.  To create an image with real depth and visual interest, the photographer must make it seem three dimensional.  How do you do that with a medium that is obviously two dimensional?  Fake it.  Use leading lines, create layers, get a different perspective.  Every photo I take, I want it to feel like you are there.  Or to feel like you want to go there.  Which is why I try to create depth in every photograph.  Now, back to the photograph being split up into thirds.  The rule of thirds is an elementary rule in photography and essentially places your main subject in a more pleasing location other than just smack in the middle.*  The rule of thirds is basically this; split your image into thirds and place the main subject or horizon lines in the intersecting thirds.  This is a great rule and should be second nature to any photographer, but what if we took it to the next step?  What if the photo was actually a cube?  If you split your image’s depth into thirds what do you get?  A foreground, a middle-ground and a background.  Placing visually interesting objects in these thirds will create depth, and how you place them will either make it interesting or distracting.  The idea of creating a cube instead of a flat plane will improve your photography tenfold.  Now, It’s up to you in how you place objects within this cube. 
In my photo below, the cattails are my foreground and out of focus for a reason as I don’t want them to distract from the main subject, the middle-ground, the barn, is my main focus, and the mountains are my background.  With an aperture of 2.8 I wanted the focus to stay on the barn and kind of soften every other layer in the photo (ie. the mountains and the cattails).  I used my 70-200mm lens to compress the landscape a bit and make it feel like the mountains were right up against the barn.  


Back in Salt Lake I was able to catch sunset in the city.  I went up to a favorite location of mine to take photos of the City Council Building.  I try to pre-visualize what kind of photos I want to take in certain locations and I certainly had some ideas of what I was looking for here.  The sky was working again for me and I was able to come away with the images I’ve had in my head.  Gotta love a day full of successful photography! 

*This rule, and every other rule for that matter, is really only a guideline (as Captain Barbossa would say).  So, learn the rules and then learn how and when to break them.

January 08, 2012

Location: Grand Teton National Park

Snake River near Schwabacher Landing

Sunrise at Snake River Overlook

Wind causing snow drifts along the road near the Tetons

I have returned from the Tetons with more than just photos, but a stronger friendship and greater photographic experience.  I was able to go with a very close friend, who is almost as crazy about photography as I am, which made it easy to drag her along in the wee hours of the morning.  We faced freezing temperatures, whiteout weather, and equipment failures, but came back with some really great photography.  


Snake River near Schwabacher Landing

Schwabacher Landing

Sunrise at Snake River access point

The first night we set out for sunset and managed to drive right into an oncoming storm which didn’t let up until the next afternoon, nixing both sunset and sunrise shots.  After attempting sunrise in the snow blizzard, only to retreat to our warm beds, we set out for some afternoon scouting.  We snowshoed down to Schwabacher Landing to get some views of the Tetons with the Snake River.  The light was great and we were finally getting some good weather.  I had gotten some good shots and was ready to move on to the next location.  I put my Gitzo tripod in the snow to set up another shot when, ‘snap’.  Two of the legs broke right at the top.  Clean off.  Like twigs.  I had the whole weekend ahead of me and I had just broken a crucial piece of my photo gear.  After the initial shock and disappointment, I realized I now had a perfectly good ‘monopod’ and would have to finish the trip with that.  Not ideal, but you do what you gotta do.  I could stick it in the packed snow and get it reasonably stable using every precaution to keep it from shaking; cable release, mirror lock-up with a 10 sec delay.  It worked out better than I thought, but I’ll be glad to get a replacement soon (future post to come).  We hustled back up to the main road and froze in 0 degree weather to catch sunset at Snake River Overlook and enjoy the last night of 2011.


Swans brave the icy ponds outside of Jackson Hole

Icy trees near Jackson Hole

Sunrise at Snake River Overlook

Alpenglow sunrise at Snake River Overlook


The next morning we got up extra early to snowshoe to a new location.  We headed down the snow blocked road, trudging through knee deep snow even in snowshoes.  We made it to the bottom clearing where it turned out the better views were back away from the river where the pine trees created some depth and foreground.  We had a much shorter hike up, but were met by a Park Ranger at the top.  He had seen our car at the top of the road and waited until we hiked out.  Apparently, river access is off limits in the winter at the Tetons.*  


Sunset in Grand Teton National Park

Icy tree near Jackson Hole

The Tetons are beautiful in the summer, but if you’re up to freezing temperatures, limited access, and raw conditions, the Tetons in the winter are a whole different experience.  You have to be prepared, but it is well worth it.  It was definitely a great way to start off the new year. 

Cold winter morning outside Jackson Hole

Icy lake outside Jackson Hole


Essential Gear:
-Graduated Neutral Density Filters (Singh-Ray)
-Lens cloths
-Tripod (a backup doesn't hurt!)
-2x gloves: one thinner for handling camera, one thicker while waiting for the light
-Snowshoes
-Extra batteries
-Hand warmers to keep batteries warm, as they drain quicker in the cold
-Patience, layers and wool socks.


*We had gone to the visitor center the day before to get information on accessing the river and were never informed of this rule. Not sure that's what the ranger wanted to hear. 

January 01, 2012

Happy 2012!


In the Tetons chasing light and celebrating the new year.  I'll give a full report upon return, but for now here is one of my first photos of 2012.  Wishing you all a happy and successful new year!

December 03, 2011

Donut Falls

Nothing like a cold morning hike with a friend as crazy as myself to a sweet destination like Donut Falls.    
Big Cottonwood Canyon, Utah. 

40.6296717 -111.6549256 7,933 ft.

100 ISO 17mm f/5 2 sec

100 ISO 24mm f/5.6  0.6 sec

100 ISO 23mm f/6.3 1 sec

100 ISO 24mm f/6.3 2 sec


November 19, 2011

Location: Big Cottonwood Canyon

ISO 320 40mm f/4 1/160 sec

ISO 200 17mm f/13 1/1250 sec

ISO 100 25mm f/5 1/100 sec Singh-Ray Warming Filter


A drive up Big Cottonwood Canyon is filled with photo opportunities without leaving sight of the road.  You don't have to go far to get some good images.  All of the above were just steps from the road.  It required a bit of venturing through snow, but when you want to get the most out of a couple hours in the canyon staying close to the road is a good option.  It doesn't hurt that Big Cottonwood Canyon offers amazing views throughout.


October 06, 2011


Great light tonight in the SLC.  The first snow of the season came last night and dusted the mountains just enough to add some drama.  The air is turning crisp and the leaves have turned.  It's a great time of year for photography.  I've enjoyed every chance to get to the mountains and shoot.  I was about to go right back up when I though the light and the time I had was best used for a shot in the city.  A previous shoot had me familiar with a great spot so I returned to capture the best light.  I thought I was too late as the sun was setting quickly, but made it just in time for the sun to peak through the clouds and light up the skyline.  The magic light was gone in minutes.  

April 06, 2011

Landscape and Nature Photography Tips

I am continually learning about photography and how to capture light.  How that light is portrayed and captured is mostly dependent on the operator of the camera, and there are ways to manipulate or control that light to make an eye-catching image.  Light is the most important aspect of photography and there are several tricks and tips to expose and capture it correctly.  Here are a few tips on the matter:

1. Use Graduated Neutral Density Filters:  Many times I use a Singh-Ray Graduated Neutral Density filter to "hold back" a brighter area of a scene that may be underexposed without the filter.  The first time I realized a camera's limitaions in range of light was in Angkor Wat, Cambodia when I climbed up to one of the temples to see the sunset.  When I exposed for the sky the foreground was silhouetted.  When I exposed for the foreground the sky was white and blown out.  At that time I was just getting into photography and learning more about what a camera can actually do.  I worked with the silhouette pictures and still came back with some good photos, but I couldn't stop thinking about what could have been and how proper exposure is actually done.  That is where a graduated ND filter comes in.  Now, every time I pull out my Singh-Ray graduated ND filter I think of that moment in my photographic learning process.  Since then I have learned so much more about photography.  I've invested in the right tools and (hopefully) expanded my artistic image.  In the image below, I use my ND filter just to darken the sky a bit without losing detail in the all important foreground.  I also used an ND filter to allow less light in and slow my shutter speed, giving the clouds a wispy look.  

Sunset at Reynolds Flat in Big Cottonwood Canyon, Utah.  
Canon 1Ds Mark II, 17-40mm f/4L.  ISO 100  f/6.3  3.2 sec

2. Use your histogram: Another tip I've most recently learned (but probably should have paid more attention to earlier) is how to use your histogram.  The histogram shows you how your image is exposed.  If most of the histogram is on the left, most of the image is dark, and possibly too dark.  And visa versa if it's on the right.  Probably the best piece of advice I have read is to try and have your histogram in the middle without touching either left or right end, but coming close.  This means every shadow or highlight is registered on the sensor, otherwise saying that nothing will be lost in the image.  This was very important for me when I shot the image below.  Parts of the histogram were further to the left, and I could see that the rocks at the bottom of the frame were probably why, but I thought that was fine since it further drew the eye to the hilighted cabins on the mountain side.  Using the histogram has helped me many times in situations where I can't see the LCD screen on my camera because of glare or when I just can't tell if the information I'm trying to gather is going to be lost.  

Light falls upon cabins in the mountains of Midway, Utah.  
Canon 1Ds Mark II, 17-40mm f/4L.  ISO 100  f/13  1/200 sec

3. Slow down:  This tip is a combination of using a slow shutter speed for different effects and the importance of using a tripod.  In landscape and nature photography a tripod is one of your most important pieces of equipment (besides the actual camera, of course).  A steady tripod allows you to slow the shutter speed to silken water, clouds, or show motion.  Also, when using a small aperture such as f/22 for large depth of field and/or ISO 100 for the best quality, the shutter speed is going to automatically slow down.  There are multiple reasons to use a tripod and will drastically help any photographer looking to improve their photography. 

Millcreek Canyon waterfall.  Canon 1Ds Mark II, 17-40mm f/4L.  ISO 100  f/8  3.2 sec

4. Get out and shoot:  Most importantly, get out and explore this great world! 

February 17, 2011

Reynolds Flat

These photos mean a lot to me, but I wont go too deep as to why.  The valley was muggy, depressing.  I hoped as my Jeep climbed up the canyon that I'd find clear skies and a recognizable sunrise.  A low fog was settling on Big Cottonwood Creek and the sun was rising faster than I had anticipated.  I strapped on my snowshoes and photographed as much as I could during the "Magic Hour" after sunrise.  I wanted to stay longer, but I had to get back to the city.  Back to the inversion.  Back to the sadness.  

Early morning at Reynolds Flat in Big Cottonwood Canyon, Utah.  

Camera Gear: Canon EOS Rebel XS, Canon 17-40mm f/4L, Singh-Ray graduated ND soft step 2 stop filter, Cokin ND8 0.9 Filter, Cheap Vivitar Tripod.

ISO 200  17mm  f/14  1/400.  Singh-Ray filter, converted to black and white in Lightroom


ISO 200  40mm  f/14  1/400.  Converted to black and white in Lightroom

ISO 200  17mm  f/18  1/500.  Singh-Ray filter


ISO 200  40mm  f/20  1/2.  Cokin filter to slow shutter speed.